A Beginners guide to User Authentication and Authorization with JSON WEB TOKENS versus Sessions in NodeJs
In a web server, authentication (https://g.co/kgs/Yy9RH2) is used to verify a user in the client-side trying to access the database or the site. The server can achieve this in various ways but in most cases, the server uses the user's information like the username and password while authorization (https://g.co/kgs/7ryDCC) is a process by which a server determines if the client has permission to access or use a resource on a site. Authorization is usually done using sessions ( https://g.co/kgs/vZViVo ) or tokens.
User Authentication with sessions
Cookies and Sessions are used to store information. Cookies are only stored on the client-side machine, while sessions get stored on the client as well as a server. When a User logs in, the server creates a session for the user and stores it in the memory. The server then creates an id called session id which is stored in a cookie on the browser (https://en.wikipedia.org/wiki/HTTP_cookie). When the User makes a request to the server, the request is sent along with the cookie. The server then checks the session id and compares it with the session information saved in its memory. After the verification is completed by the server, the server responds with the data to the User.
Now let's see how User Authentication works with NodeJs!
Let's get started with the following steps:
- Create a folder in your system.
- Open the folder in your terminal.
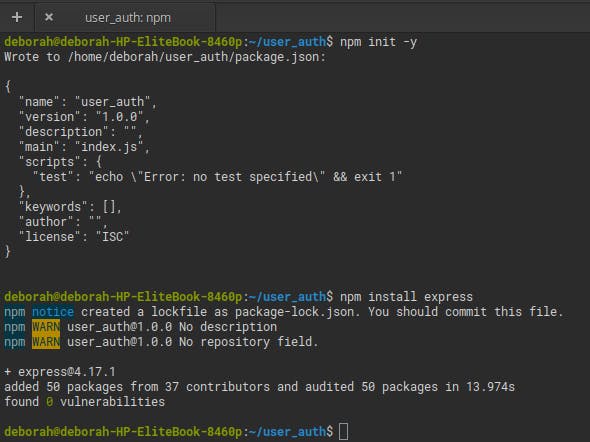
- Run
npm init -ycommand to initialize your NodeJs application in that directory. - Run
npm install expressin the same directory to install the express framework for your app.
- Then open the folder in your code editor.
- Create a file and save it as
server.jsthis file will contain the script to run your server. - In the
server.jsfile, include the express module with therequire()function and call the function
const express = require('express');
const app = express();
- Next, set your app to listen on a port 3000
app.listen(3000);
- Install a package called
nodemonas a dev dependency for your app that allows your server to restart automatically when changes are made to your app, with this commandnpm install --save-dev nodemon - Next, in your
package.jsonfile, go to the scripts section and add thedevStartkey andnodemonwith theserver.jsfile as value that tells your server to start your app with nodemon
"devStart": "nodemon server.js"
- Next, start your server by running
npm run devStartin your terminal.
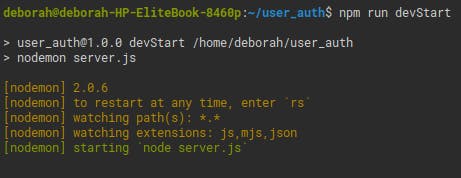
Your server starts running but returns nothing. Now let's create routes and start making requests to the server.
Your app requires that users login with their username and password
- In the
server.jsfile, create an array called users which represents your database that contains the credentials of your users as an object of username and password. This array of objects would contain the credentials of the users.const users = [ { username: "Jordan", password: "jordan123" }, { username: "kate", password: "kate1234" } ]; - Next, create a route to this users JSON object using a
GETrequest that responds with the users JSON object. To enable the use of JSON objects in your app, add theexpress.json()middleware withapp.useto yourserver.jsfile.
app.use(express.json());

app.get('/users', (req, res) => {
    res.status(200).send(users);
});
- To test this request, we will be using postman which can be downloaded from (https://chrome.google.com/webstore/detail/postman/fhbjgbiflinjbdggehcddcbncdddomop//%40).
- Your server is still running, so you do not have to restart your server because you have
nodemoninstalled. - Go to postman and on the drop down to the left, choose
GETand set your url tohttp://localhost/3000/usersand click on the Send button to send the request. You should get a response of the users object.
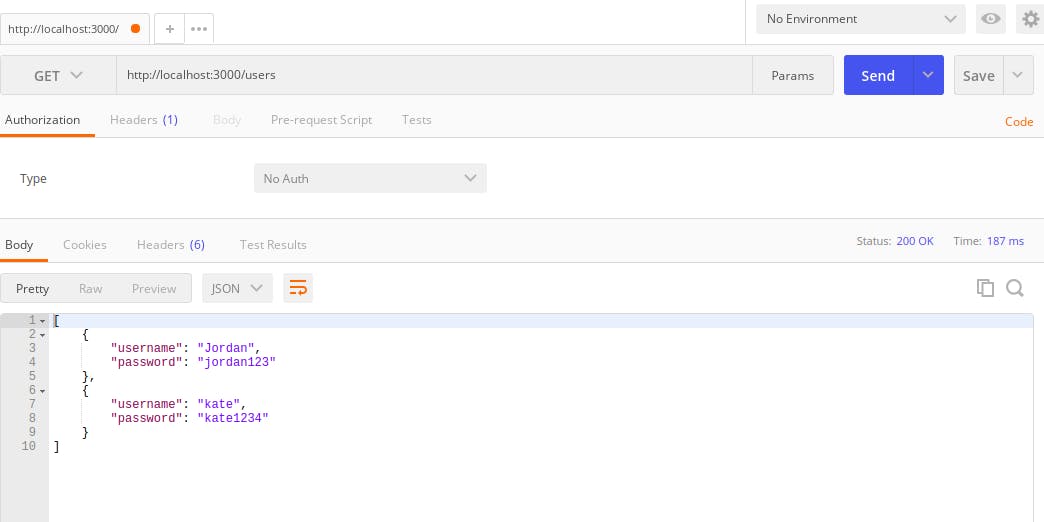
The passwords of the users are in plain text in the database which means anyone that gains access to your database can have access to all the passwords of your users and be able to do anything with it.
To avoid this we use hashing which can be achieved by a library called bcrypt.
HASHING PASSWORDS WITH BCRYPT
There is a process of hiding the passwords for security reasons from been seen by anyone who gains access to your database and it is called Hashing.
Hashing a password is the process of converting a password with a one-way algorithm and a hash function into a string that is difficult to be reversed.
Bycrpt is a library designed for hashing passwords by combining a salt with the hashed password. A salt is random data that is used as an additional input to a one-way function that hashes data.
So in your app, install the bcrypt library with npm install bcrypt. After it's done installing, include it in your server.js file with the require() function
const bcrypt = require('bcrypt');
Using bcrypt requires two steps:
- Create a salt
- Then use the salt along with the password to create a hashed password.
To implement this, we need to create a route. So create a POST request to the users route.
app.post('/users', (req, res) => {}
Delete the objects in the users array in servers.js file and set it to an empty array. When you use the POST request, you will create a user that will be added to the empty array(the database).
So in your route handler for the POST request to the '/users route, create a user
app.post('/users', (req, res) => {
    const user = { name: req.body.name, password: req.body.password };
    users.push[user];
    res.status(200).send(users);
});
While your server is still running, go to postman and make this post request to this route http://localhost:3000/users, set the type of request to JSON(application/json) and in the body of the request include the JSON object of the name and password of the user.
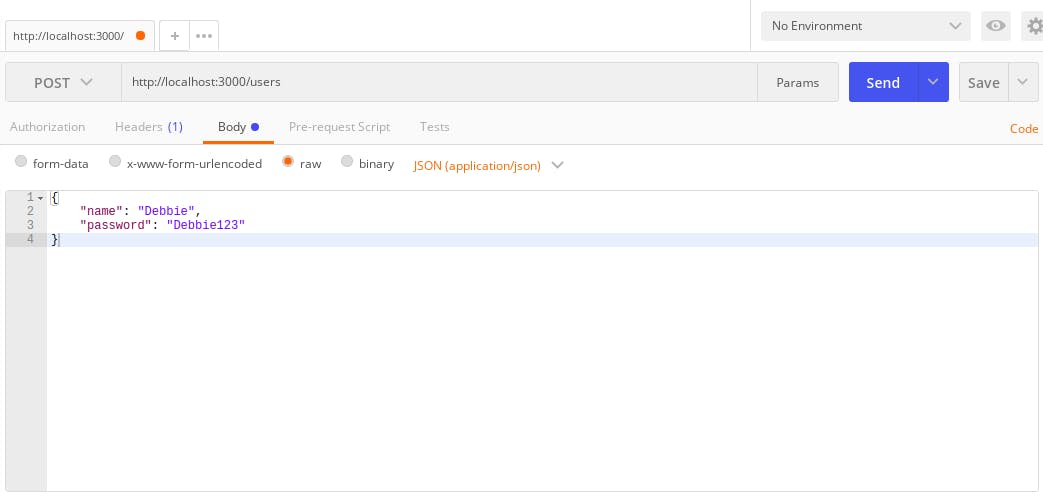 The body of the request.
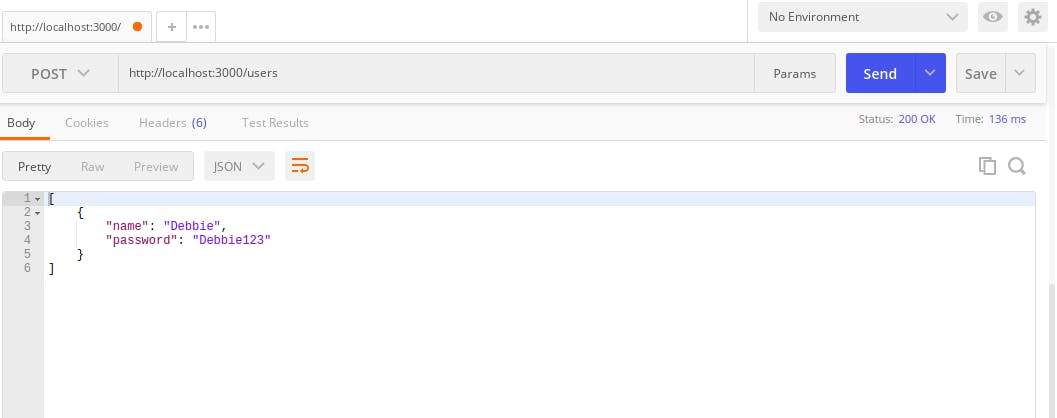 The body of the response.
You can see that the password is not hashed. To hash this password, you generate a salt using bcrypt in the route handler for the post request with bcrypt.genSalt() the genSalt() function accepts a parameter called rounds with the default of 10, which means the time it will take for the hashed password to be created.
In your route handler use an async function because bcrypt is asynchronous and a try catch block and within the try block generate the salt and the hashed password. Replace the password with the hashed password and then return an error in the catch block if anything goes wrong.
app.post('/users', async(req, res) => {
    try {
        const salt = bcrypt.genSalt();
        const hashedPassword = bcrypt.hash(req.body.password, salt);
        console.log(salt);
        console.log(hashedPassword);
        const user = { name: req.body.name, password: req.body.password };
        users.push(user);
        res.status(200).send(users);
    } catch {
        res.status(500).send();
    }
});
Now create a post request on postman again and see that your response for password is now hashed!
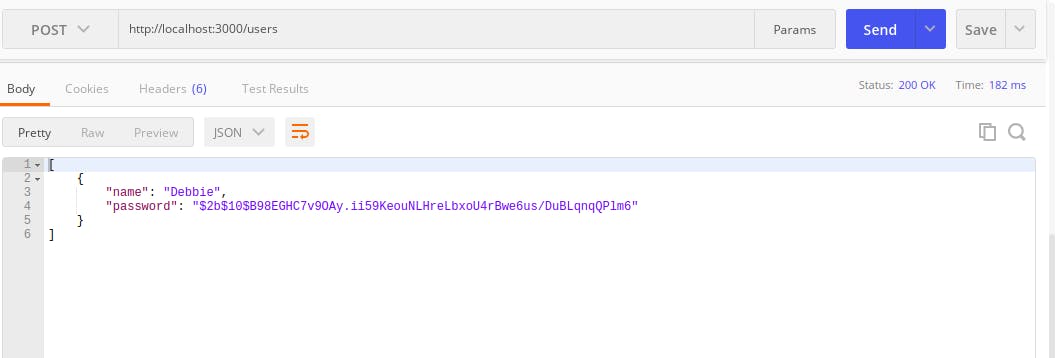 Try making a GET request on postman and it will respond with the user's username and password will be hashed.
Now that you have successfully been able to hash the password of a user and get the information of the user. The next thing to do is to create the login route that will check/compare the user's information with that which was created and you can achieve this by using the
bcrypt.compare()method.
In the login route, the first thing you will do is get the user then check if the user exists, if the user does not exist, throw an error. Use the try catch block as you did in the previous route '/users' for the POST request. In the try block, use the bcrypt.compare() methods that accepts two parameters; the first parameter is the password of the body of the request and the second parameter is the hashed password and compares them to see if they match, if they match, respond with success and if they do not match, the catch block will handle the error and respond with a message 'user not allowed'.
app.post('/users/login', async(req, res) => {
    const user = users.find(user => user.name = req.body.name);
    if(user == null) {
        return res.status(404).send("User does not exist");
    }
    try {
        if(await bcrypt.compare(req.body.password, user.password)) {
            res.send("Success");
        }
    } catch {
        res.status(500).send("user not allowed");
    }
});
To test this code on postman,
- create a user with the POST request to
http://localhost:3000/users - next, login the user with the POST request to
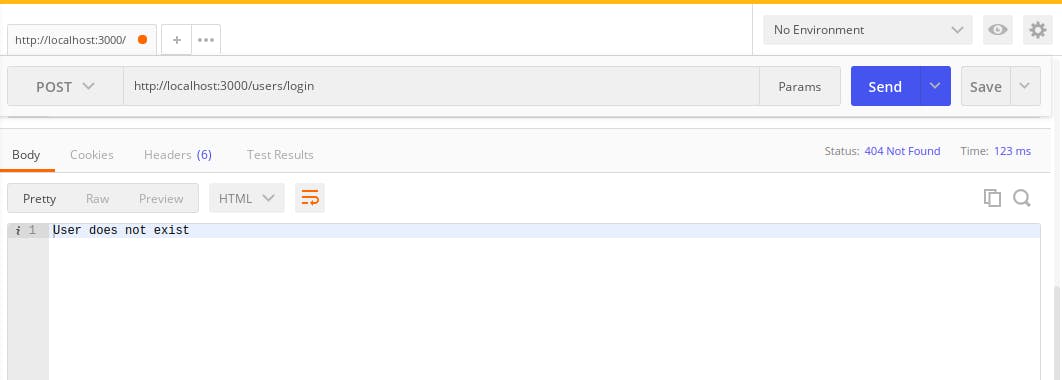
http://localhost:3000/users/loginAfter logging the user it responds with success because the password the user used to log in matched with the hashed password that was created when the user was created.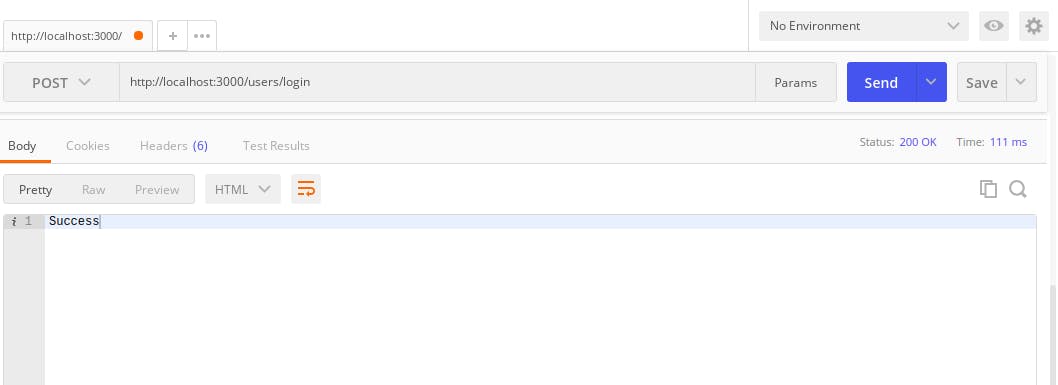 Now try changing the password of the user in the body of the login request, to something else and repeat the two steps above. It will respond with 'User does not exist' as specified in your
 catchblock.
THE COMPARISON BETWEEN SESSIONS AND JSON WEB TOKEN FOR AUTHORIZATION
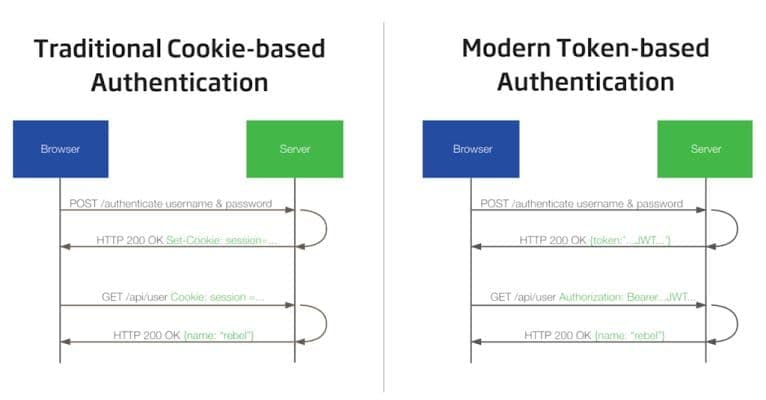 The above diagram is an illustration of authorization with session versus JSON WEB TOKENS(JWT) which shows the basic processes of how authorization works with sessions and JWT.
The image on the left represents authorization with sessions. First, the user creates an account and logs in with a username and password on the browser via the POST request. The server authenticates the requests like you just did above and will create a session for the user and store it in the memory. The server then creates an id called session id which is stored in a cookie on the browser (https://en.wikipedia.org/wiki/HTTP_cookie). When the User makes a request to the server, the request is sent along with the cookie. The server then checks the session id and compares it with the session information saved in its memory.
After the verification is completed by the server, the server responds with the data to the User.
The image on the right represents authorization with JSON WEB TOKENS, the user creates an account and logs in with the username and password via the POST request to the server. After authentication is successful, the server creates a token called the JSON WEB TOKEN, this token is signed or serialized with a secret key by the server and is sent to the client. When the
user makes a request to any page on the site, the request is sent alongside the JWT to the server on the Authorization header. Then the JWT signature gets the user information from the JWT and verifies it, then sends a response to the client.
The main difference between using Sessions for authorization and using JWT is that the session authorization stores the users information on the server while the JWT authorization stores the users information in the token on the client. The advantage of using JWT for authorization is the users information is stored in the token and therefore, in large scale websites, users do not have to log in again to access resources on the part of the site that uses another server. The secret key can be used for all the parts of the sites that use different servers unlike sessions.
THE DESCRIPTION OF THE STRUCTURE OF JWT
JWT has a structure consisting of three parts; the header, the payload and the verify signature.
Below is a diagram which can be found on jwt.io that shows these three parts of JWT
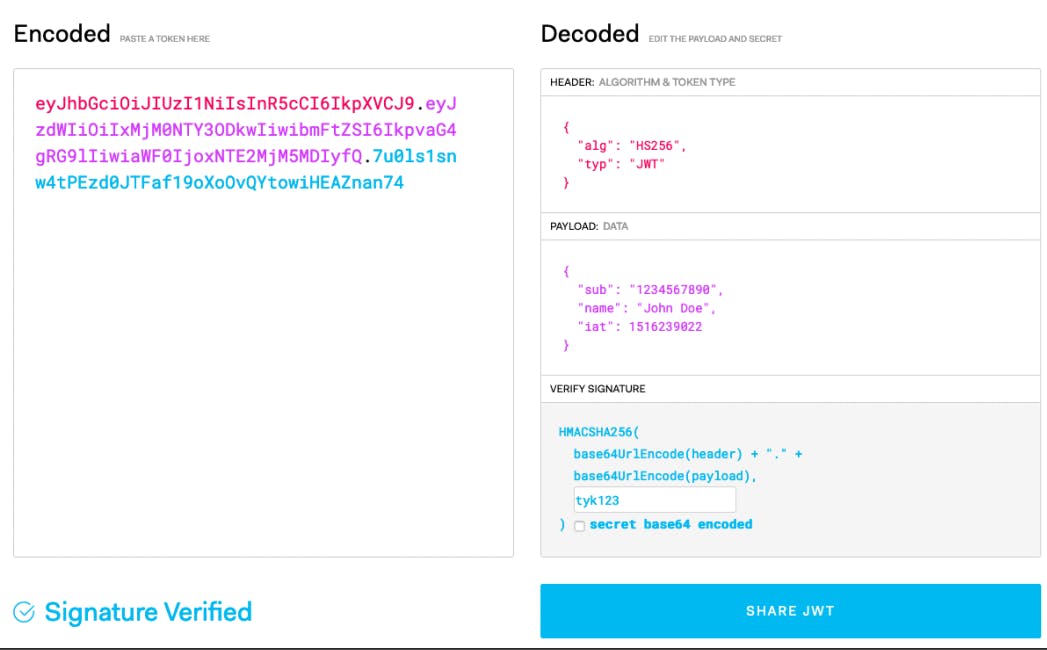 To the left is the encoded token which is sent to and from the user and to the right are the three parts, the header consists of the algorithm for verifying the signature and the type of the token which is JWT.
The second part, the payload is the data of the user and it comprises of three parts; the reserved, the private and the public. The reserved part of the payload is the predefined and optional but recommended part that consists of information of the user like the exp(expiration date of the token), isa(issued at/manufacturing date of the token) and sub(subject) etc. The public part can be defined at will.
The third part, the verify signature is the part that takes the header and payload and base64URL encodes each of them together with a secret key and hash them with an alogrithm defined in the header.
THE IMPLEMENTATION OF JWT FOR AUTHORIZATION IN NODEJS
You have completed the authentication of the user above for your app, the next thing is the authorization of the user with JSON WEB TOKEN to enable or disable access to users logged in after authentication.
You will be creating the token In your server.js file, in the post request to the /users/login route.
app.post('/users/login', async(req, res) => {
    const user = users.find(user => user.name = req.body.name);
    if(user == null) {
        return res.status(404).send("User does not exist");
    }
    try {
        if(await bcrypt.compare(req.body.password, user.password)) {
            //start implementing JWT here
            res.send("Success");
        };
    } catch {
        res.status(500).send("user not allowed");
    }
});
To implement JWT in your app, the first thing you need to do is install the jsonwebtokens and dotenv libraries to be able to generate tokens and secret keys that will be used to serialize your user object.
STEPS FOR IMPLEMENTING JWT IN YOUR APP
- Install
jsonwebtokenlibrary that creates your tokens withnpm install jsonwebtokenand include in your server.js fileconst jwt = require('jsonwebtoken'); - Install
dotenvmodule that loads environment variables from a.envfile intoprocess.envwithnpm install dotenvand include in your app at the top in your server.js filerequire('dotenv').config(); Create a
.envfile that will contain the environment variables and the secret key.Get the name from the body of the request in the
/users/loginrouteconst name = req.body.name;Create the token with
jwt.sign()which takes two parameters; the user object and the environment variable in theprocess.envthat contains the secret key.const accessToken = jwt.sign(user, process.env.ACCESS_TOKEN_SECRET);The
ACCESS_TOKEN_SECRETis the environment variable that will store the secret key. This variable is set in the.envfile with a nodejs module calledcrypto. Thecryptomodule in nodejs uses an algorithm that performs data encryption and decryption.In your terminal, while your server is running on one tab, open another tab and type
nodefollowed by this statementrequire('crypto').randomBytes(64).toString('hex')Here, you are using the require() function to get the crypto module and
.randomBytes(64).toString('hex)means that the crypto module should generate a key of 64 hexadecimal strings as the secret token. Your output should look like this
Copy this secret token and in your
.envfile, set theACCESS_TOKEN_SECRETenvironment variable to the secret token.ACCESS_TOKEN_SECRET = 9f922829a8022703ed1f296752c1f99ffbc55baa3ed49570620dd9e1f339fbb0016f154f4832664e9f92446546dc0827e5ef4ba83d68589add414def7a5fa08cThen back in your
server.jsfile, return theaccessTokenas a JSON obect in your serverres.json({ accessToken: accessToken });Go to postman and create a user using the
/usersroute with a POST request After making this request, this should respond with this below
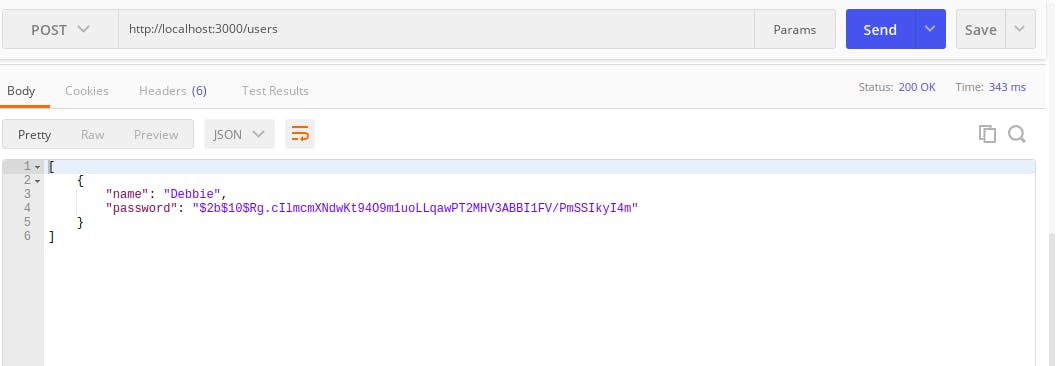 Now login the user with the
 /users/loginroute with a POST request and it should respond with your access token
 Summary: When the user logs in and is authenticated, the user sends the JWT in the Authorization Header.
Verify the token that was sent by creating a middleware that will
- get the token from the authorization header in
req.headers['authorization'] - check if the token exists and if not return an error of status 401 meaning the token doesn't exist, but if the token exists move unto the next step
- verify the token with
jwt.verify()that takes three parameters; the token, environment variable that contains the secret key and a callback function. The callback function has two parameters; the error and the user. - check if there is an error and return a status of 403 which means access to the requested resource is forbidden for some reason.
- set the user on the request to the user
lastly call the next() function that allows you to use the middleware in your GET request to the
/productsroute.function authenticateToken(req, res, next) { const authHeader = req.headers['authorization']; if (authHeader == null) { return res.sendStatus(401); } jwt.verify(authHeader, process.env.ACCESS_TOKEN_SECRET, (err, user) => { if (err) { return res.sendStatus(403); } req.user = user; next(); }); };
- get the token from the authorization header in
- For instance, you have a products resource on your app that only users that are logged in and authenticated and verified can access that resource.
So create and array of objects called products that will contain the username of the users logged in and their orders in an object.
const products = [ { name: "Debbie", orders: "Food" }, { name: "Mike", orders: "Laptop" } ];app.get('/products', authenticateToken, (req, res) => { const {name} = req.user; const productUser = products.filter(product => products.name === name); if(!productUser) { return res.send("User has no product"); } res.json(productUser); });req.userthat was defined in the middleware and store it in{name}using object destructuring. The next line uses thefilter()function in JavaScript to find the user of the product that has the same name used to login. Then uses anif conditionto check if that user exists and if the user doesn't match, it returns an error message"User has no product. If the user exists, it responds with the user as a JSON object.
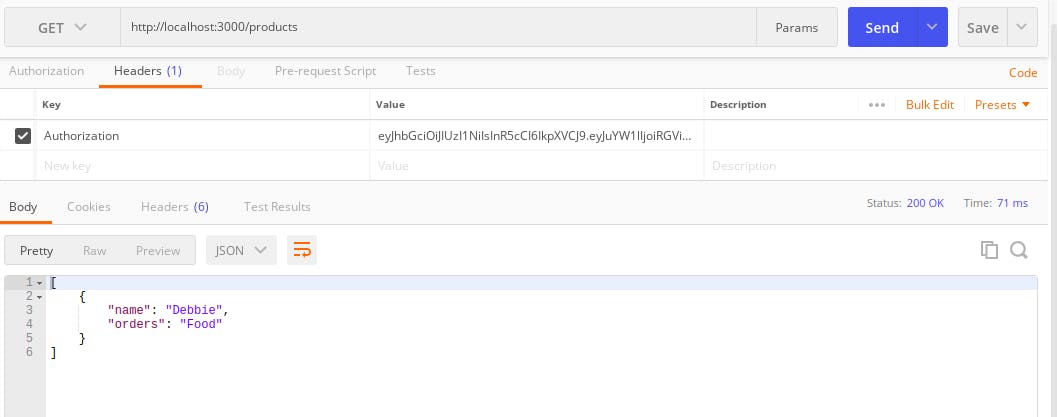
To test this code, copy the token returned by the user and on postman create a GET request to this route http://localhost:3000/products and in the Headers - key, set it to Authorization and in the value, paste the token and click on Send.
It should return this below in the body of the response
Conclusion
Now you have successfully completed authentication for a user with bcrypt and authorization with JSON WEB TOKENS with dotenv and the crypto library for your app.
